
At SYNCRO we believe we’ve created the most innovative chat tool out there with our chat to SMS tool, but we also realize some people prefer the old method of PC to PC chat, which is why we have developed a desktop live chat tool just for them! In this article we are going to explain how our PC to PC chat works and all of its functions.
Desktop Live Chat
 HOW PC TO PC MODE WORKS: Our PC to PC chat tool is quite user-friendly and easy to use. First thing you need to know is that when you enable PC chat, it will disable the text to chat function of our tool. Now that we’ve gotten that out of the way, the chat system works exactly like our chat to SMS feature, when someone sends you a chat request from your website you can respond instantly from the backend of your SYNCRO account in the “PC Chat” section of the backend. Our system also allows you to have multiple chats going at one time, all you need to do is click on the tabs to go back and forth betweens chats.
WHAT IF I WANT TO ENGAGE WITH A USER WHO IS ON MY SITE: With SYNCRO’s desktop live chat you are able to push chats to be people currently on your website, as you are able to see that there is a user on the site. We are going to get into this feature further down in this article.
Now we are going to show you how to enable our desktop live chat tool and walk you through all its features.
Enable and Disable Desktop / Mobile Chat Mode
Enabling our PC based live chat tool is very easy with just a few steps:
STEP ONE:
First you need to login into your SYNCRO account by clicking here https://beta.syncrowebchat.com/user/login:
STEP TWO:
in the top menu, click on “My Site”
![]()
![]()
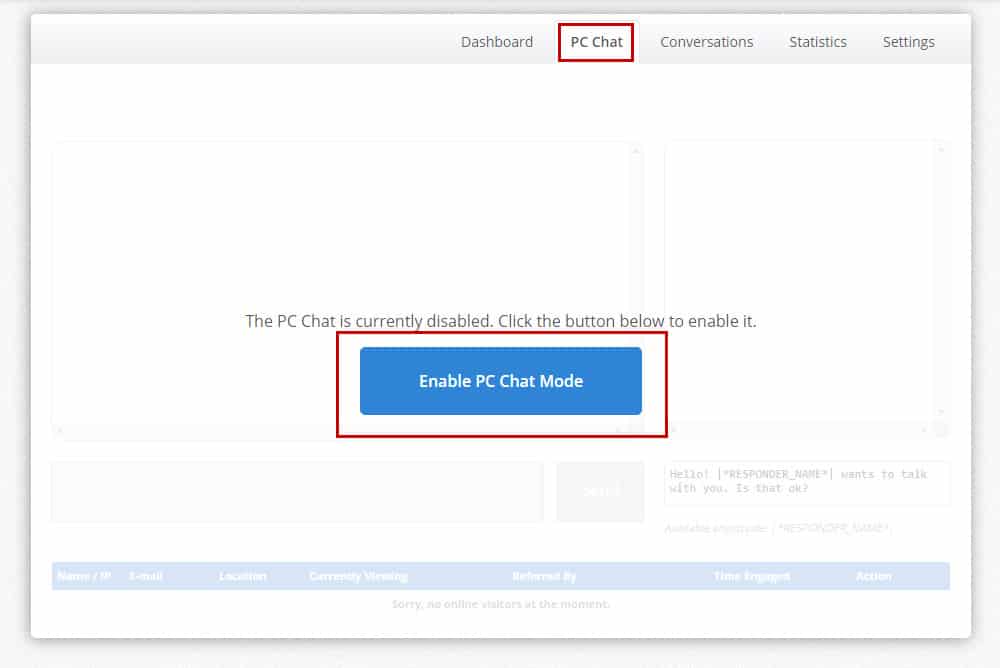
STEP THREE:
click on the “PC Chat” tab, and then click the blue “Enable PC Chat Mode” button.
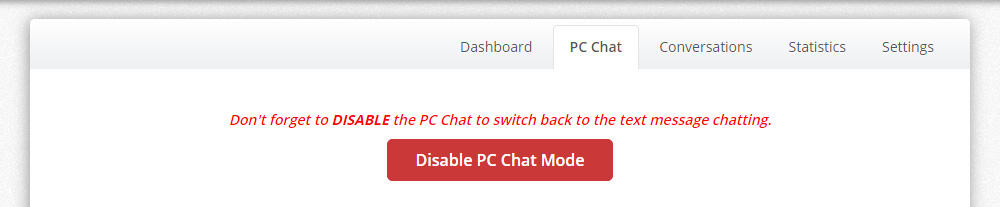
STEP FOUR:
You have now enabled the PC to PC chat tool. To disable this and return to our text to SMS, you just need to simply click on the red “Disable PC Chat Mode”
button.
That’s all you need to do to enable or disable this feature. I told you it was easy!
Now that you have decided to try our desktop live that too, you’re probably wondering how to use it and what you’re looking at.
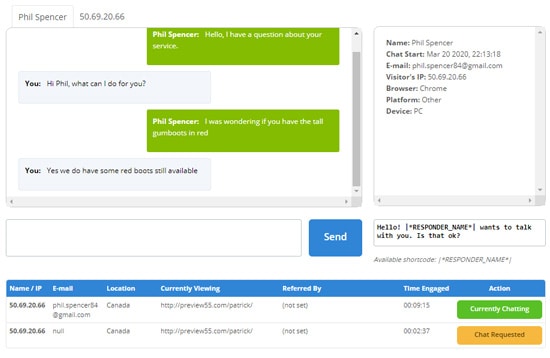
Desktop PC interface
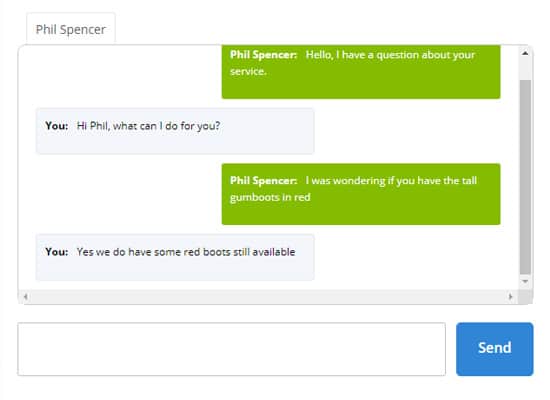 The chat user interface in this section is identical to the user interface the user is seeing on your website. The users chat bubble is green and located to the right of the chat box, and the owners chat bubble is grey and located to the left of the chat box. This box does not limit or dumb-down the text the user enters on their end, so you will see everything exactly how they have submitted it. The chat box also has a scrollbar to the right so that you are able to scroll up and down in the conversation so you don’t lose any info, or need to ask for something the user has already given you.
See Visitors Details
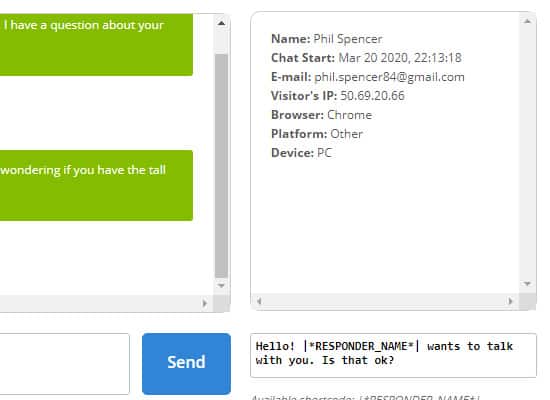 One of the best features of our PC based live chat tool as that you are able to see all of the users information. This little box breaks down everything you need to know: Users name, contact info, the date and time the chat was started, the visitors IP address (this helps to determine where this user is contacting you from), the platform they are using, and finally the device they are using (PC, Mac, or mobile).
You may be wondering why you need to know some of this information. Some of these items are great for understanding your demographic and what type of people are contacting you. For example, if you are keeping track of all the IP addresses in your chat history, you can determine if there is a trend in who is contacting you based on their location. You can find out where someone is from by looking at the users location in the bottom box under the “Location” field.
Another great example is if you find that most people are contacting you via mobile, it gives you an opportunity to audit the mobile version of your website to ensure it is working properly, and what kind of improvements you can make to it, to make the users experience even better.
Push live chats to website visitors
One of the reasons we developed our PC live chat for support tool was so that you can push live chats to users on your site, to see if you can answer any of their questions. The interface will show you what page of your site the user is viewing, which allows you to push a chat and ask them if they have questions about a specific service or product. For example, if you own an online clothing store and someone is viewing a pair of boots, you can ask them if they have any questions about that specific boot, and offer some additional options.
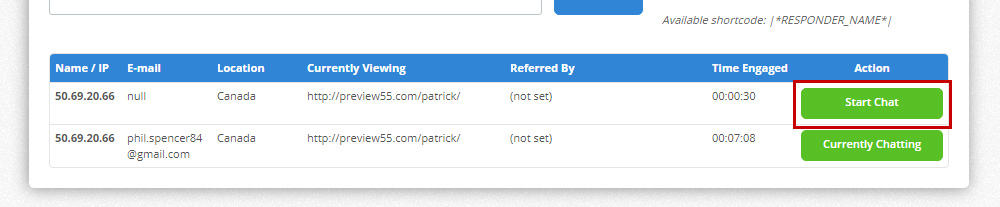
This section also breaks down some of the same information as the visitor details to the right of the chat box, but also includes the time/duration of the conversation you’ve had with the user. This information is helpful for the future, so you can plan out how many chats you can have in a work day, etc.
Edit your Autoresponder Short Codes
When you push a chat to an online user, our system allows you to automate your beginning statement making it easier for you to instantly start a chat without using time typing out a greeting, and potentially losing that user.
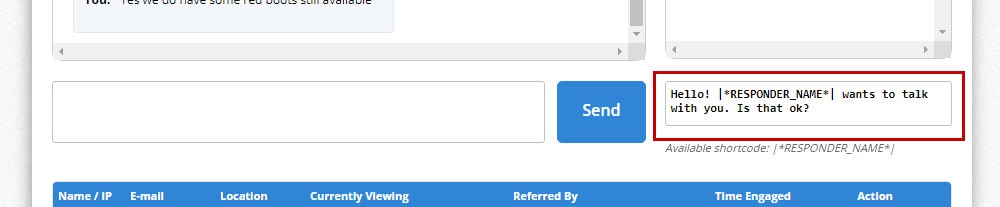
This box is located below the visitor information box, and you can type right in there to edit your automated message. Always make sure to use the shortcode |*RESPONDER_NAME*| in your message. This automatically enters the users name into your greeting, making the greeting sound more personal and less robotic. People are more comfortable responding to a chat when it sounds like they’re talking to an actual person on the other end.
This concludes the breakdown of our live chat tool for a desktop computer. We are always looking for new ways to improve and innovate our live chat for support software, so this won’t be the last article like this you’ll see, so check back soon! And for more great articles on our tool and its many features visit our blog here. If you’re interested in signing up, then please click here.