SYNCRO Configuration Guide
Welcome to SYNCRO : Website Chat to Text
Never miss a sales lead again. Engage your leads on the go!
Welcome to SYNCRO website chat to text. With SYNCRO you can use the power of texting to engage with your website leads instantaneously, from anywhere. The following guide will help you set up your SYNCRO custom settings, and have you up and running in a few minutes.
Real People Support
At Atomic55 we pride ourselves on providing our clients with live and local phone support; we’re happy to extend that benefit to you! If you have a question or a concern, want to learn more about leveraging the SYNCRO Tool, or have feedback about SYNCRO, please don’t hesitate to contact us.
Support is available using SYNCRO or visit or FAQ section to submit a ticket.
To use this guide, begin by logging into your SYNCRO admin panel, click “My Site”, then click “Settings”. Throughout this guide, always remember to click the “Save Changes” button if you make any changes.
You’ll find it at the bottom of the settings window. It looks like this:

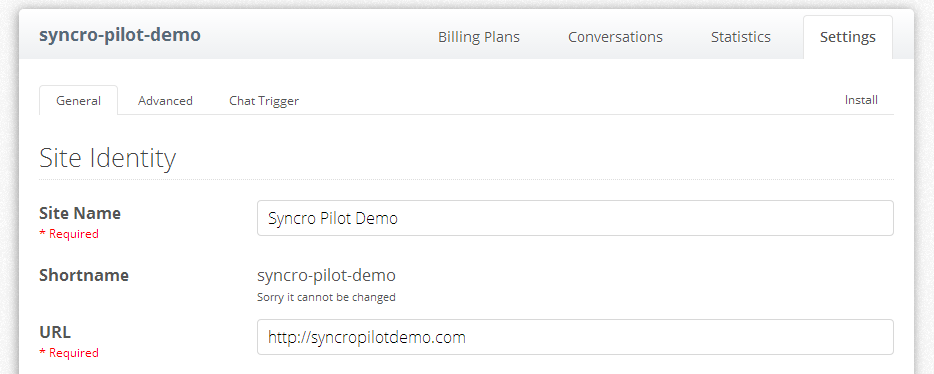
Step #1: Settings: General Tab
Site Identity:
1. Site Name
The Site Identity is used by SYNCRO to create your SYNCRO Site Name. We recommend that you use your First and Last name, to make it easier for you to maintain your SYNCRO account. For the purpose of the pilot program, we have configured this setting on your behalf.
2. Shortname
The Shortname is the name used to identify your SYNCRO instance and will be used to identify you if you call support. The Shortname is auto-generated and cannot be changed.
3. URL
Enter the website address of the website where you would like to install the SYNCRO website chat to text tool (e.g. www.yourdomainname.com). For the purposes of the pilot, we have configured this setting on your behalf.
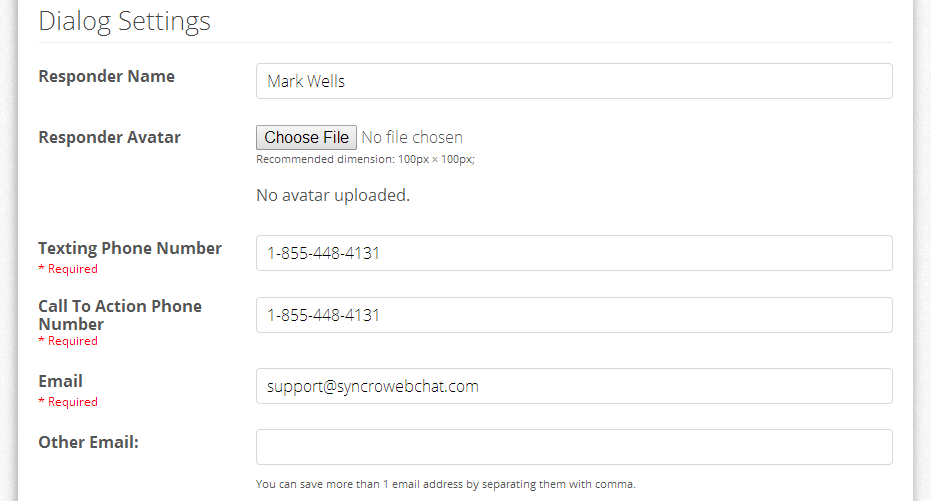
Dialog Settings:
- Responder Name
Enter your name, as it will appear to the people you chat with. - Responder Avatar
This image will appear in the chat box next to your Responder Name
(Recommended image dimension: 100px × 100px.) - Texting Phone Number
This is the mobile phone number that SYNCRO uses to send you messages. For SYNCRO to work, it’s crucial that this number is active and entered correctly. - Call To Action Phone Number
This is the phone number that will be displayed to visitors on the chat window. You may use the same number as the Texting Phone Number, or a different number if you don’t wish to advertise your mobile phone number on the website. - Email Address
Your email address. SYNCRO will use this to notify you when you receive a lead. Please make sure it is an active address that you check regularly. - Other Email Address
Other Email Addresses will receive a copy of all notifications. You can save more than 1 email address by separating them with comma.

- Call to Action Title
This is the welcome message that visitors will see in the chat box. (e.g. I can help you. Would you like some assistance?)For best results, we recommend you use the default message provided. - Title
- Description
Describes to the user what the chat box is for. (e.g. SYNCRO will connect you with Chris that works at Re/Max so you can find the right property instantly!) For best results we recommend you use the default text provided by SYNCRO. - Start Mode
This setting determines how SYNCRO appears to new users.
“Engage Mode” will open the chat window for them by default (recommended).
“Minimize Mode” keeps the chat window minimized at the bottom right of the page, and will only open chat if the user clicks on it.
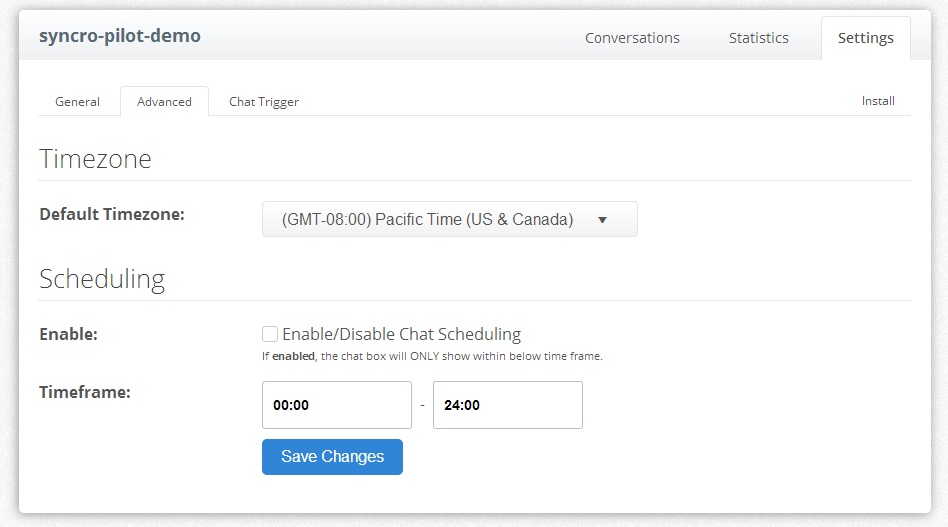
Step #2: Settings: Advanced Tab
Default Time Zone:
Please set your current time zone. SYNCRO uses this information for scheduling and other purposes.
Scheduling:
- Enable –You can Enable and Disable Chat Scheduling by checking the box. If enabled, the chat box will only appear to users within the timeframe you set below. For example, enable scheduling if you don’t want people to be able to use SYNCRO at night or during a specific time of day.
- Timeframe – You can set the time frame that the SYNCRO chat tool is available on your website. For best results, we recommend that you leave it available 24hrs per day.
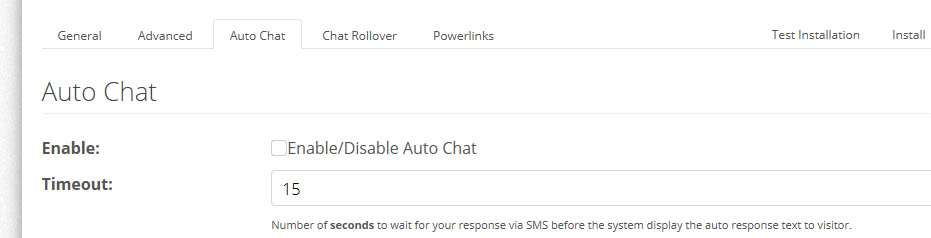
Step #3: Settings: Auto Chat Tab
Enable:
Check the “Enable/Disable Auto Chat” box to turn on the chat rescue feature. Auto Chat is an automatic responder that will reply to your visitors when you are unavailable.
Timeout:
This is the amount of time that SYNCRO will wait before engaging the automatic responder. For best results, use SYNCRO’s default value (60 seconds).
Select Auto Response Text:
Select the chat rescue text message you would like SYNCRO to send on your behalf if you are unable to respond. You can select from the default messages or create your own.
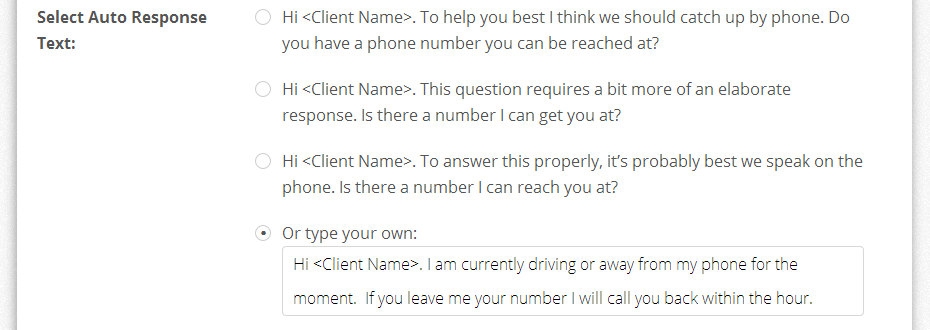
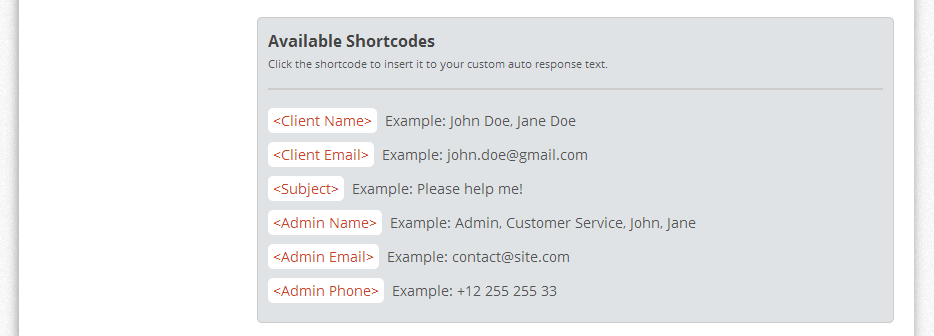
When creating your own custom message, you can click from the list of available Shortcodes to use information in your message that your visitors have provided about themselves.
For example, let’s say your phone number is 1-800-555-SOLD and your custom Auto Response Text is as follows:
Hello <Client Name>, I’m currently driving or away from my phone. If you leave me your number, I’ll call you back as soon as I can. Or if you like, please call me at <Admin Phone>.
Now, if Janet arrives at your website and enters her name to use SYNCRO chat, she will see the following if you don’t reply after 60 seconds.
Hello Janet, I’m currently driving or away from my phone. If you leave me your number, I’ll call you back as soon as I can. Or if you like, please call me at 1-800-555-SOLD.
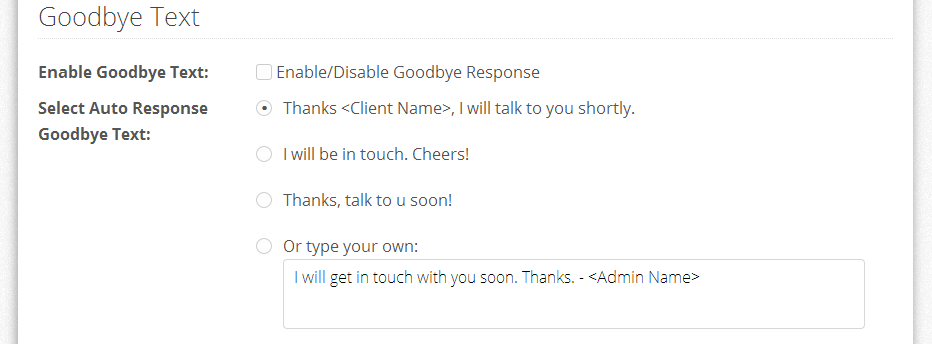
Enable Goodbye Text:
Check the “Enable/Disable Goodbye Response” box to turn on an automated goodbye message for SYNCRO. This message will be sent automatically by SYNCRO at the end of a Auto Chat conversation.
Select Auto Response Goodbye Text:
Select the goodbye message you would like SYNCRO to use, or create your own. This works in the same way as the custom Auto Chat text described above.